
Note: Initially, when purchasing your Skyware (ADA compliant) Outward Facing Web Reservation site, Skyware's own Web Master will enact any customization for you. If you wish have not yet already, and wish to purchase the Web Reservation (Web Booking Engine) site version to be used by your Property, please contact us at Sales@SkywareSystems.com.
The Web Reservation (Web Booking Engine) site draws information from several places within Skyware. This Help Topic will guide you through the steps involved in setting up the Skyware's Outward Facing Web Reservation system to suit your Property, (including enabling mobile and/or contactless check-in capability if desired), allowing you to subsequently customize the information shown on your Web Booking Engine as desired, entering or adjusting the appropriate information on the relevant screens (as detailed below).
Customizing the information shown on the Web Reservation screen allows you to alter the appearance dramatically, by adding your Property image and accommodation images, and allows you to include as much or as little information about the rooms or sites available at your Property as you wish (including any features), to add any disclaimers, your custom confirmation or cancellation policies, to specify any packages available, select what rates should be used for booking on the web (including any negotiated rates if desired) and add a message to the general screen display to be seen when the web page is opened. This provides flexibility and allows you to keep your outward facing web reservation system appearing current.
Skyware's Outward Facing Web Reservation site may be accessed through Skyware by using the Web Reservations command found in the Web section of the Other Front Desk Tasks Menu, which provides a view of the interface seen by the end user when they make a reservation from the web.
To Begin: The Property Definition Screen
Several different tabs within the Property Definition screen provide information utilized when generating the External Web Reservations Set Up.
The first place you will need to enter information is on the Property Definition Screen, using the Web/Email tab. This area allows you to enter defaults to display on the web, and other settings for your Skyware web site. From this screen you can suppress the calendar, enter email settings, enter a custom message when there are no rooms left to display, and enter a cancellation policy or custom confirmation page.
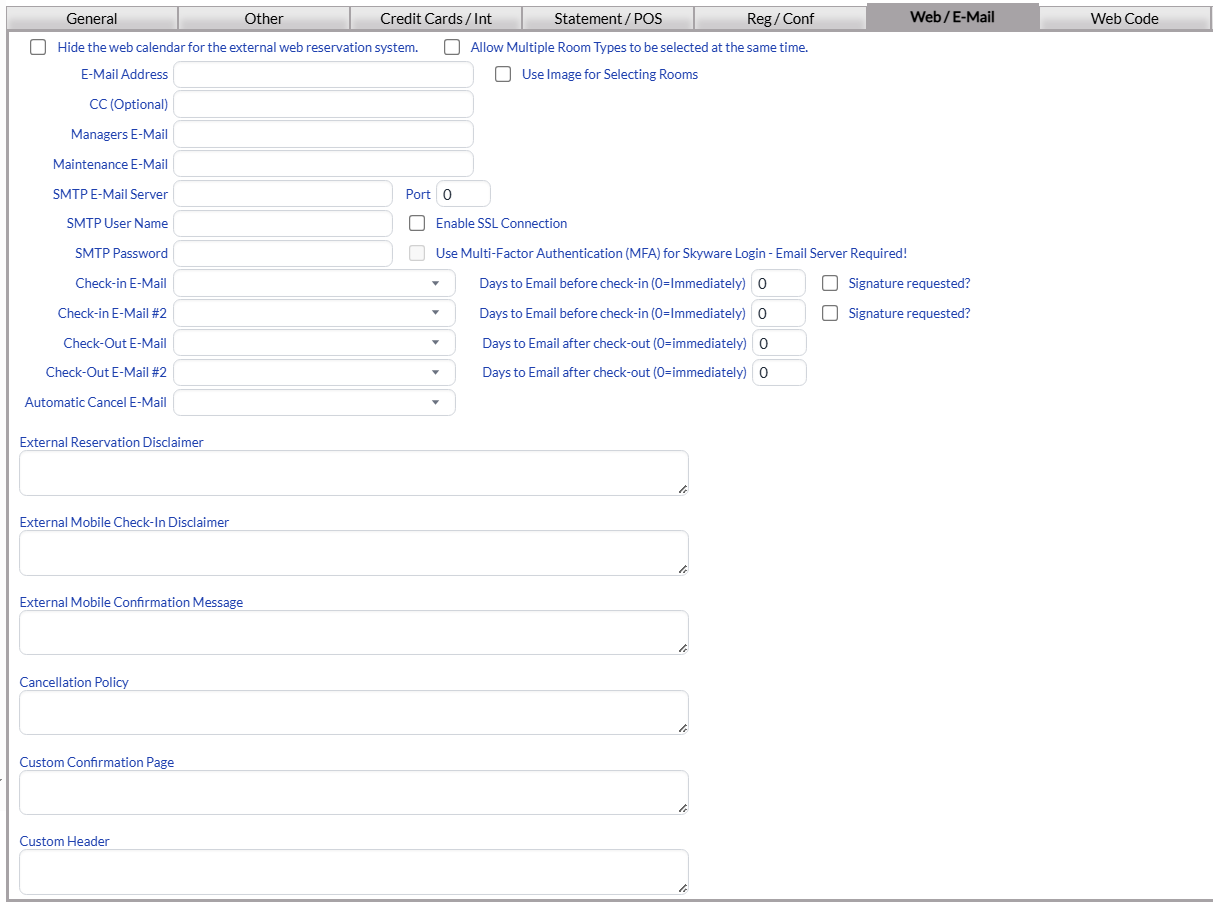
Hide the web calendar for the external web reservation system: The web calendar is a graphical calendar that a potential guest may pick dates from. This box may be checked or unchecked. By default it is unchecked. If it is checked, the calender will not be shown on the website.
Allow Multiple Room Types to be selected at the same time: This box may be checked or unchecked. By default it is unchecked.
E-Mail Address: This is the email address for your Property, that you wish the confirmations (and any other emailed documents) to originate from. Enter it manually into the field.
Use Image for Selecting Rooms: Use an image for selecting the room number. This box may be checked or unchecked. By default it is unchecked.
CC (Optional): Email a Carbon Copy of the emails sent to this address. This field is optional, either enter it manually into the field or leave it blank.
Managers E-Mail: This is the email to send interface and other issues to, from Skyware Systems. Enter it manually into the field.
Maintenance E-Mail: Email to send maintenance requests to, when added. Enter it manually into the field.
SMTP E-Mail Server: This is the SMTP Email Server address for your Property. Enter it manually into the field.
Port: This is the SMTP Server Port Number. The default number is 0. You should change it to the Port number for your property.
SMTP User Name: This is the SMTP Server User Name: Enter the name manually into the field.
Enable SSL Connection: This box should be checked to enable the SSL connection for email sending.
SMTP Password: This is the SMTP Email Server Password for your property. Enter it manually into the field.
Check-in E-Mail: This is an option for a custom email Check-In Confirmation. You can select one from the available options in the drop-down menu, or leave it blank (to send no email). If the option you desire is not available, you can create one. See How To Create or Customize Your Documents for more details.
Days to Email before check-in (0=No E-Mail): This option goes with the Check-In Email - if you have selected a document to send, you MUST specify here how many days before check-in it should be sent. By default the option -0- is entered in the field, meaning no email will be sent.
Signature Requested?: This box may be checked or unchecked. By default it is unchecked. If it is checked a signature will be requested from the guest for the emailed check-in document. For an electronic signature request e-mail to be sent as the check-in email, this box MUST be checked. Otherwise, the e-mail sent as the check-in e-mail will not require a signature.
Check-in E-Mail #2: You can choose to send a second follow-up custom Email confirmation. You can select one from the available options in the drop-down menu, or leave it blank (to send no email). If the option you desire is not available, you can create one. Again, see How To Create or Customize Your Documents for more details.
Days to Email before check-in (0=No E-Mail): This option goes with the Check-In Email #2- if you have selected a document to send, you MUST specify here how many days before check-in it should be sent. By default the option -0- is entered in the field, meaning no email for #2 will be sent.
Signature Requested?: This box may be checked or unchecked. By default it is unchecked. If it is checked a signature will be requested from the guest for the emailed check-in #2 document. For an electronic signature request e-mail to be sent as the check-in email, this box MUST be checked. Otherwise, the e-mail sent as the check-in e-mail will not require a signature.
Check-Out E-Mail: This is an option for a custom email Check-Out Confirmation. You can select one from the available options in the drop-down menu, or leave it blank (to send no email). If the option you desire is not available, you can create one.
Days to Email after check-out (0=immediately): This option goes with the Check-Out Email - if you have selected a document to send, you can specify here how many days after check-out it should be sent. By default the option -0- is entered in the field, meaning the email will be sent out immediately on the guest checking out.
Check-Out E-Mail #2: You can choose to send a second follow-up custom email Check-Out Confirmation. You can select one from the available options in the drop-down menu, or leave it blank (to send no email). If the option you desire is not available, you can create one.
Days to Email after check-out (0=immediately): This option goes with the Check-Out Email - if you have selected a document to send, you can specify here how many days after check-out it should be sent. By default the option -0- is entered in the field, meaning the selected email will be sent out immediately on the guest checking ou
Automatic Cancel E-Mail: This is an automatic Cancellation email that gets sent out from your property when a reservation is canceled. You can select one from the available options in the drop-down menu, or leave it blank (to send no email). If the option you desire is not available, you can create one. Again, see How To Create or Customize Your Documents for more details.
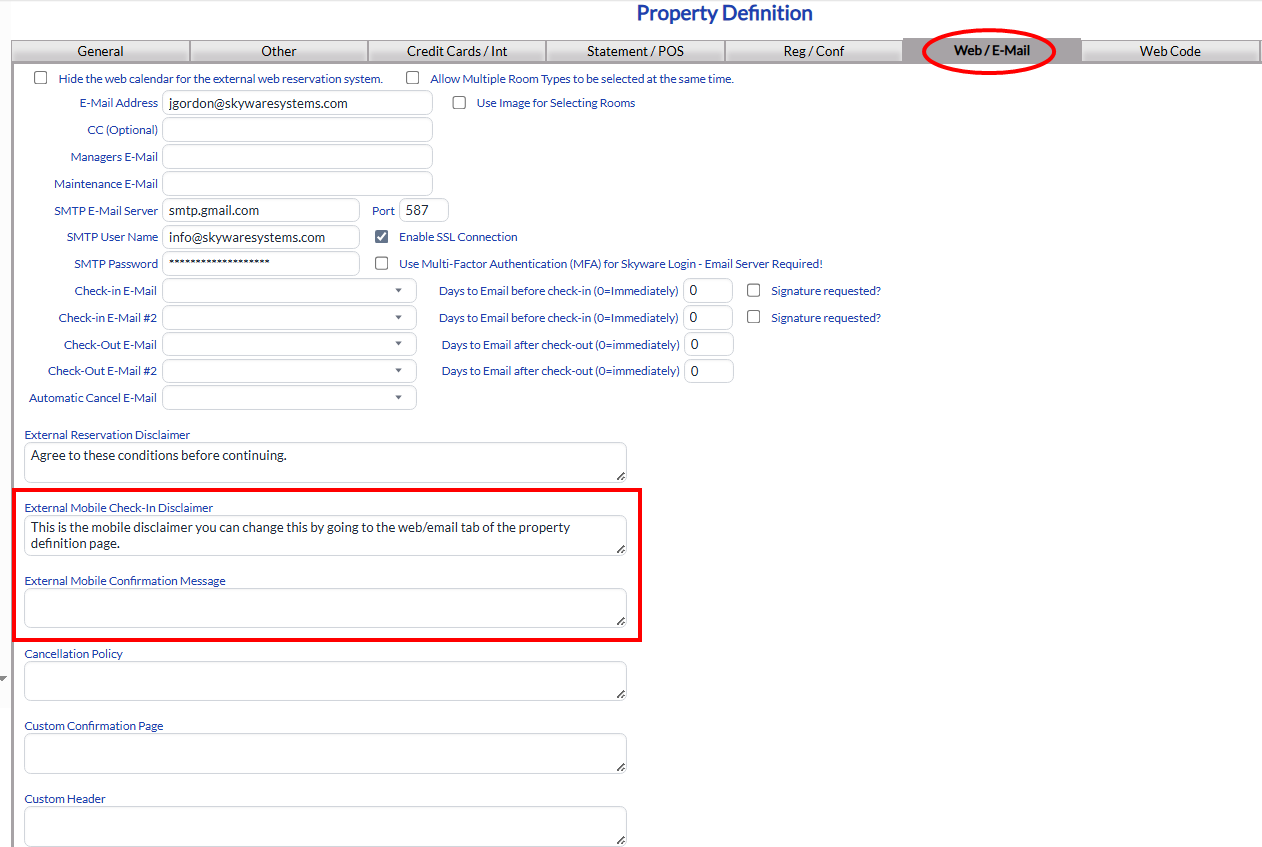
External Reservation Disclaimer: This field is for the external reservation disclaimer that will be displayed on Skyware’s external web reservation system. Enter it manually into the field.
External Mobile Check-In Disclaimer: This field is for the external mobile check-in disclaimer that will be displayed when the guest uses the mobile check-in option after reserving a room using Skyware’s external web reservation system. Enter it manually into the field.
External Mobile Confirmation Message: This field is for the external mobile check-in confirmation message that will be displayed when the guest uses the mobile check-in option after reserving a room using Skyware’s external web reservation system. Enter it manually into the field.
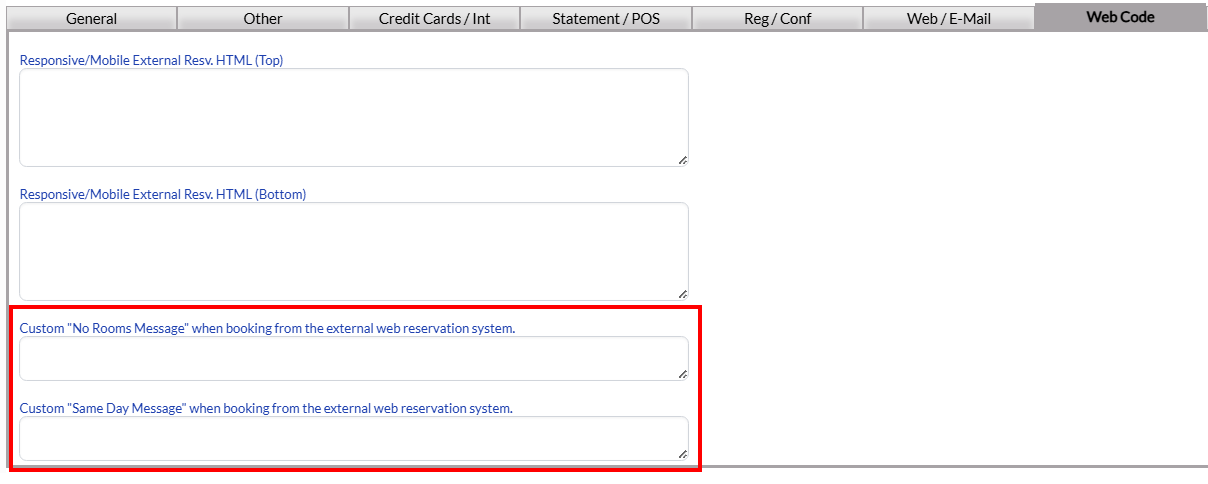
Custom "No Rooms Message" when booking from the external web reservation system: You can have a custom message that will display if no rooms are available for a specific date on Skyware’s external web reservation system. Enter it manually into the field.
Cancellation Policy: This is the custom Cancellation Policy that will be displayed on Skyware’s external web reservation system. Enter it manually into the field.
Custom Confirmation Page: This is the custom Confirmation Page (URL) that will be displayed on Skyware’s external web reservation system. Enter it manually into the field.
Parameters that will be appended to the end of the URL will be:
Confirmation Number=XXXX…
First Name=XXXX…
Last Name=XXXX…
Arrival Date=YYYY-MM-DD
Departure Date=YYYY-MM-DD
EMail=XXXX…
Custom Header: Appears between the Head tags on Skyware’s external web reservation system. Enter it manually into the field.
Note: On the tab, if you decide you have made an error, click the "Cancel" button in the local tool bar to undo it rather than the back button in the browser. The back button will attempt to return you to the previous screen, rather than simply undoing whatever change you have made.
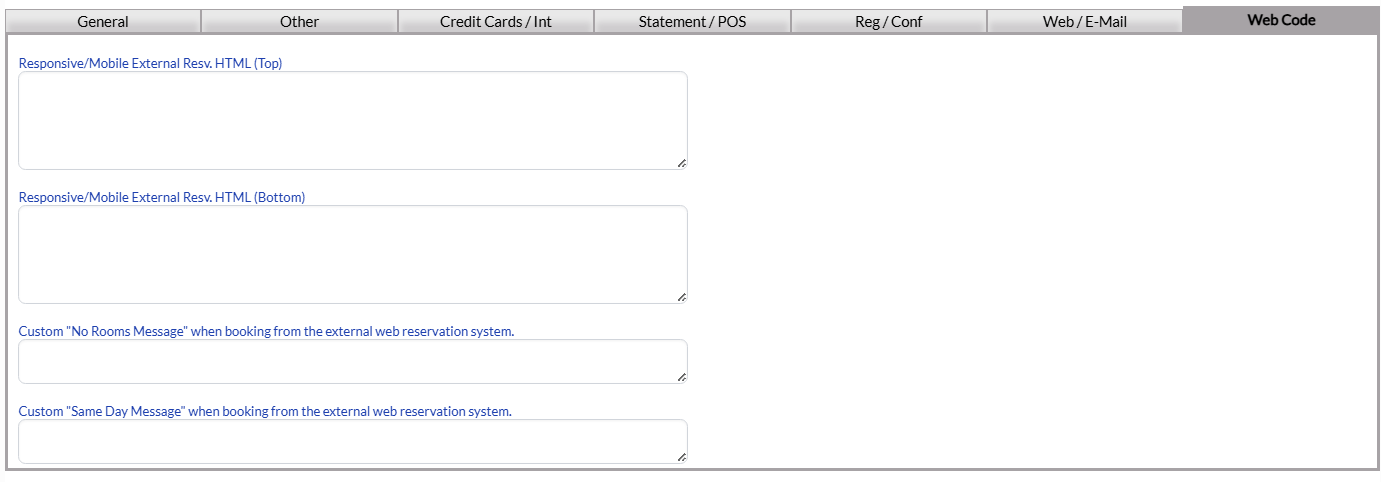
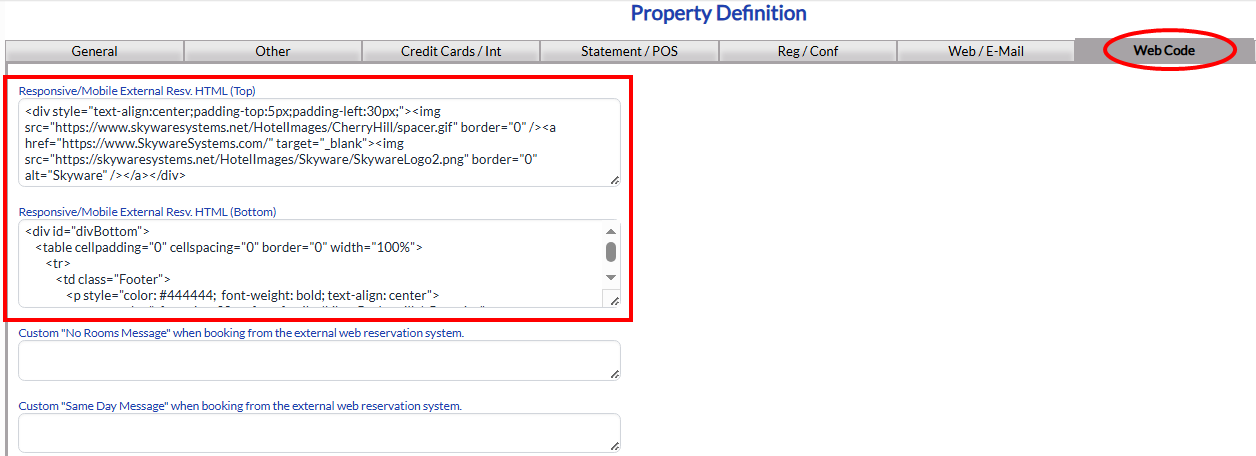
The Web Code tab allows you to enter the HTML code for the information for the top and bottom sections of the web reservation screen to “encapsulate” Skyware’s reservation system.
Note: The fields to be completed here are for the regular PURCHASED (ADA compliant) version of the Web Reservation (Web Booking Engine) site version used by your Property.
Responsive/Mobile External Resv. HTML (Top): Top of the screen HTML string for the responsive/mobile external reservation system.
Responsive/Mobile External Resv. HTML (Bottom): Bottom of the screen HTML string for the responsive/mobile external reservation system.
The tab also allows you to add custom messages for your version of the web reservation screen, with fields for both a "Custom "No Rooms Message" when booking from the external web reservation system" and a "Custom "Same Day Message" when booking from the external web reservation system".
Open the Other tab to enter the image that will be used as the Hotel Image - the Image of the Hotel to be displayed when making a reservation.
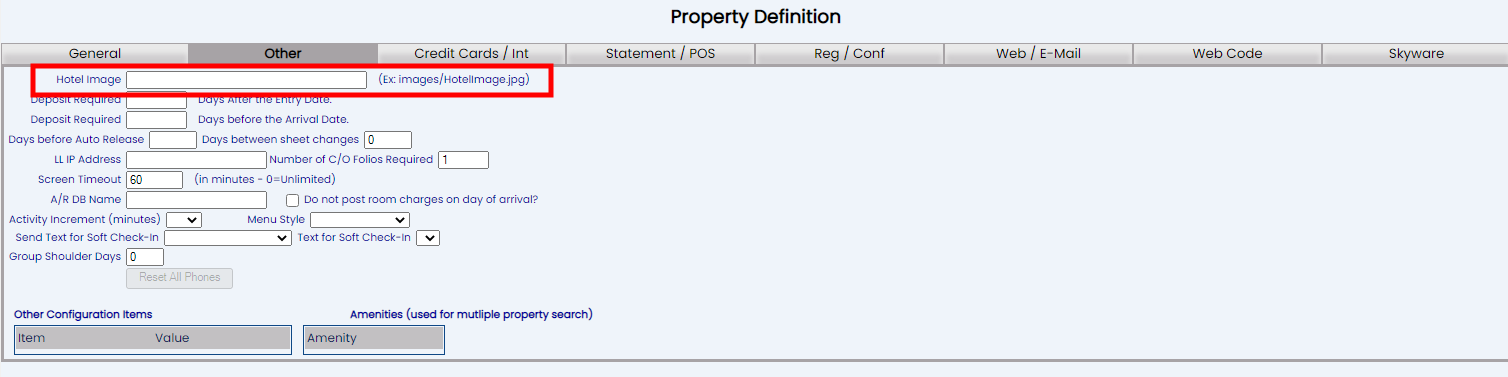
Hotel Image: This should be a link to an image of the Property. (For example: images/HotelImage.jpg)
Note: The Other tab contains information about various other Property Definitions, as well as the picture that will appear on your web site for web reservations, (such as deposit defaults, an Auto-Release (Room Block) default, number of folios to print at check out, amount of inactive time before the user is automatically logged out, a custom statement form and some accounting and miscellaneous check flags). ONLY the Hotel image field is important for the external web reservation site.
Any Rate Plan Types that should be available on the Outward Facing Web Reservation system need to be enabled using the Rate Plan maintenance screen.
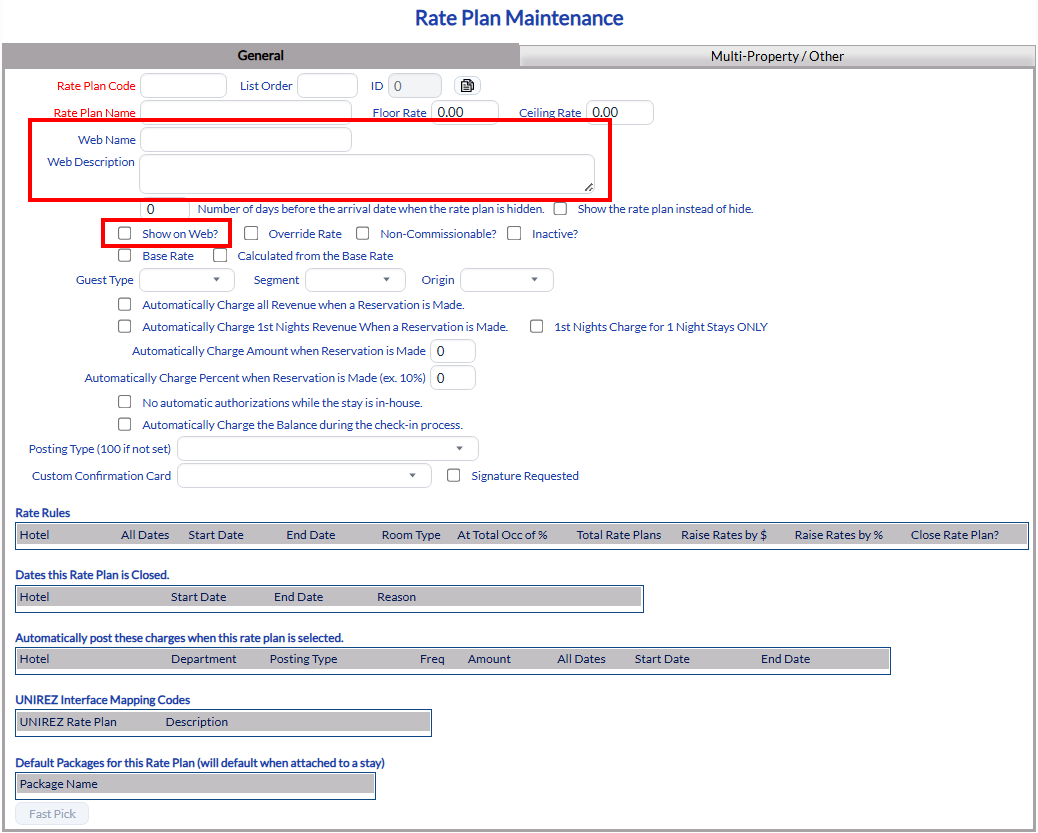
As well as any other relevant details, ensure that the following fields are completed for any Rate Plan Type intended for use on the website.
Web Name: Name shown to the guest when entering a reservation. This will be the name shown to the end-user when making a reservation on-line. Enter the name you wish guests to see displayed on-line, if this Rate Plan Type is to be available using the web reservation system.
Note: You do NOT have to use the same name for the Web Rate Plan Name as for the Rate Plan Name used within Skyware. For example you may want the "Rack" Rate to be posted on the web as "Standard" Rate, or the "Best Available" Rate.
Web Description: Web Rate Plan Description. This will also be shown on the web. Enter the description, if any, you wish guests to see displayed on-line.
Note: You do NOT have to enter a description, if you feel the Web Name is self explanatory enough.
Show on Web?: This box may be checked or unchecked. By default it is unchecked, but to have the Rate Plan be available on-line it must be checked. Check to show the Rate Plan for the web reservation system.
Ensure that these fields have been completed for EVERY Rate Plan Type which are to be available on the Outward Facing Web Reservation system.
Note: The rate plan types created and enabled for on-line use can be specific to a promotion, a company, or target audience, or can be used for several different ones. See also How to Set Up Web Rate Codes.
(Negotiated rates may be set up for Companies which you do business with, in order to pull that rate into a reservation for a guest associated with that company. A negotiated rate is typically a rate that has been agreed upon between your property and a company. Any guest associated with that company would then be entitled to that negotiated rate).
The Rates available using the outward facing web reservation system are specified using the Rate Plan Type screen. However, if you wish to allow special rates for Companies which you do business with to be available on-line, this must be determined separately using the Account screen, and will be available to the guest using the web page by using the "Code" field. Web Rate Codes can also be useful for any promotions or specific groups of guests you wish to have access to a different rate.
Note: Ensure that the relevant Rate Plan to be used for a web rate code has been created and enabled. See also How to Set Up Web Rate Codes.
To allow any group to have access to a web rate code, a company must first be created, to then be set up with a negotiated rate. The Company name can be the name of your Promo, like Summer Special, or a target audience, Knitters Expo, for example.
Any negotiated or special rates that will be available on the Outward Facing Web Reservation system need to be enabled using the specific Account screen, on the Other tab, for the associated company. Every negotiated or special rate should have a separate code associated with it, that will then be entered by the guest on-line.
Note: In order to set up negotiated rates for use with the web page, an account first needs to be set up (this may be using the Guest Information or Group information area, or the Negotiated Rates screen directly if you have the Sales and Catering Module from Skyware), and a negotiated rate attached. If a negotiated rate has been attached, the account screen will state this.
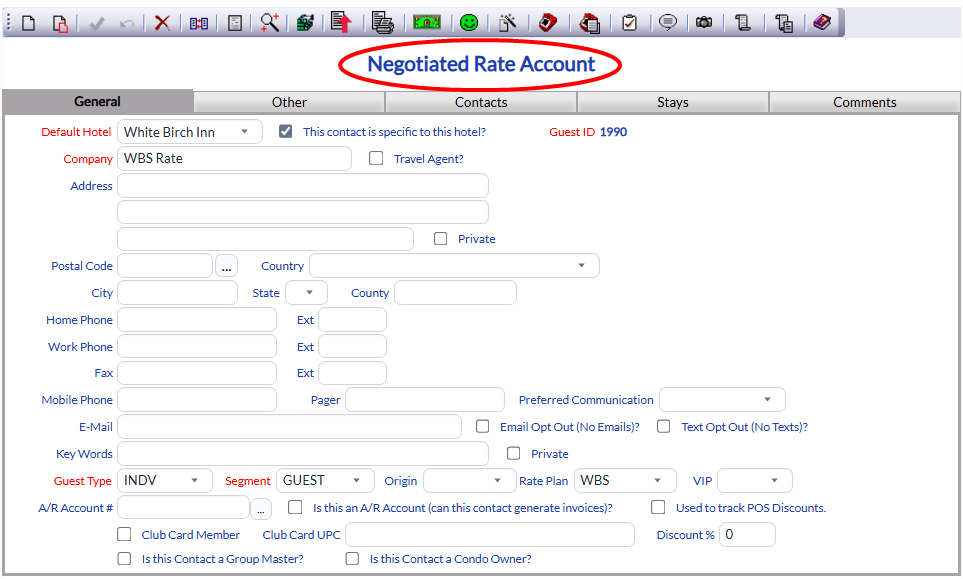
If the account screen does NOT say "Negotiated Rate Account" the account does not have a negotiated rate associated with it, and the field needed to enter a code for attaching the Company for rate purposes when making a web reservation will NOT be available.
Open the Other tab for the Negotiated Rate Account screen:
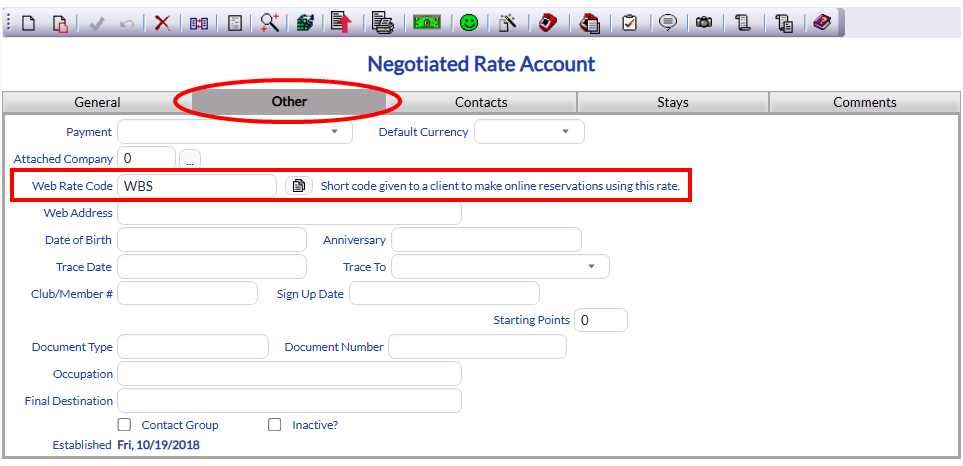
Web Rate Code: The short code to be used by the guest if attaching this company, for rate purposes, when making a web reservation. Enter the code manually into the field.
Note: The Copy icon next to the Web Rate Code field may be used to copy the booking URL to the clipboard for this web rate code. If clicked, a message window from Skyware will pop up informing you that the URL has been copied to your clipboard.

Any Room Types that should be available on the Outward Facing Web Reservation system need to be enabled using the Room Types maintenance screen, with the details you wish to display on-line being entered in the description field section. Any images you wish to be viewable for the Room are also added using this screen.
Any Room Type within Skyware can be designated as available on-line. If enabled, the Room Type will appear in the Outward Facing Web Reservation system as it appears in the Room Desc field (this is the description of the Room Type that the Room Code used by Staff is based on). Other details are optional but should be included (description, images). Enter the information into the highlighted fields on the General tab shown below.
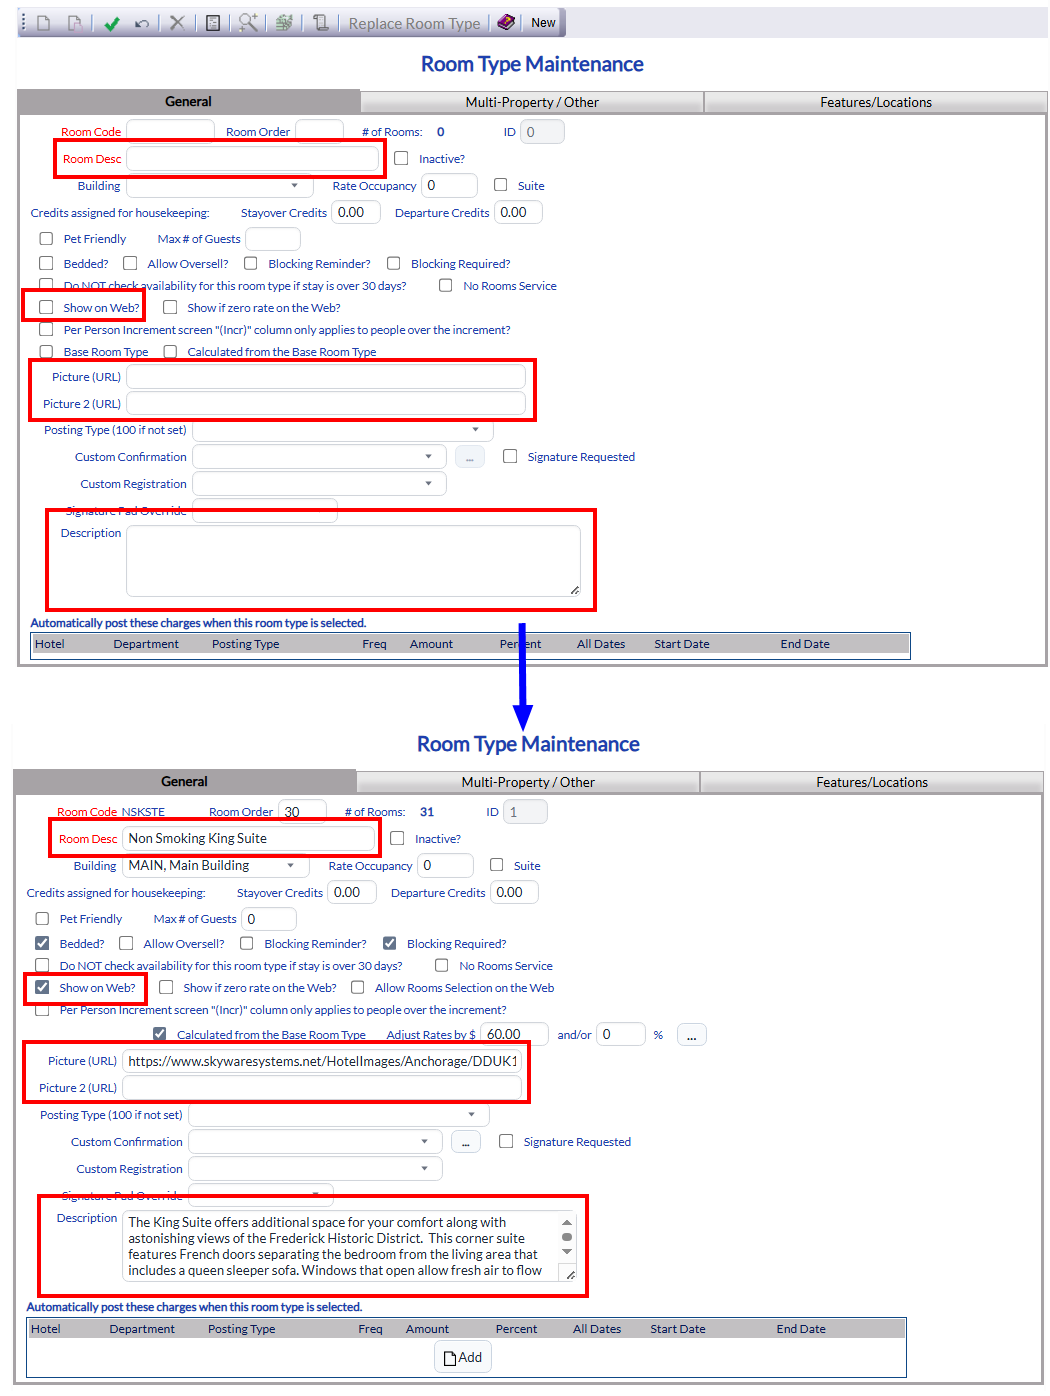
Room Desc: Description of the Room Type.
Note: This field must be completed for ANY Room Type within Skyware, not just when enabling the Room Type for use on-line.
Show on Web?: Determines if this Room Type is shown on the outward facing web reservation system. This box may be checked or unchecked. By default it is unchecked, but to have the Room Type be available on-line it must be checked. Check to show the Room Type for the web reservation system.
Picture (URL): Enter the URL to the image that should be shown with this Room Type on-line. Type or paste in the link.
Picture 2 (URL): You can have a second image associated with the Room Type. If so, type or paste in the link here.
Description: Additional description of the room type. HTML tags can be used. This is the Room Type description that the guests will see on the web when making a reservation. Include any desirable features (size of room, TV, other amenities). A HTML tag may be used.
Ensure that these fields have been completed for EVERY Room Type which are to be available on the Outward Facing Web Reservation system.
Features and Locations:
Any Features you wish to have shown with the Room Type on the external web booking engine should be listed in the Feature/Locations tab.
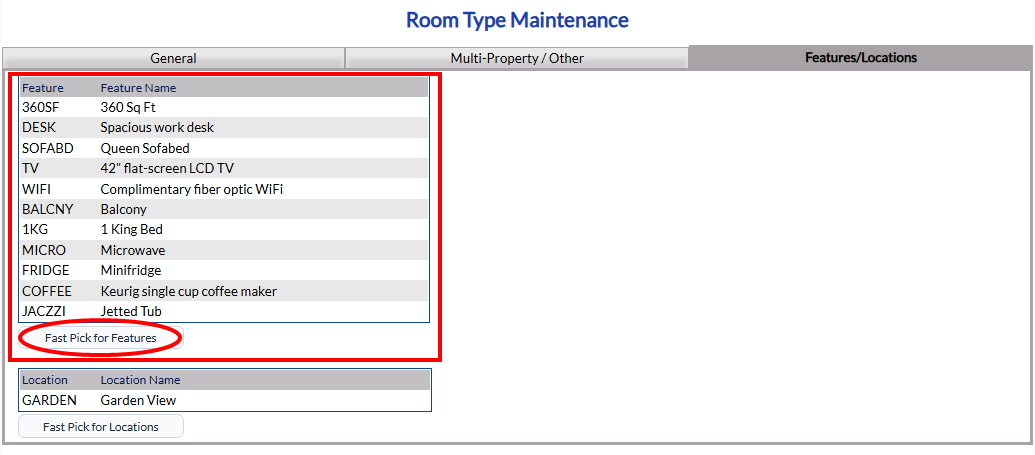
Click on the Fast Pick for Features button to open a pop-up window showing all the available feature options.
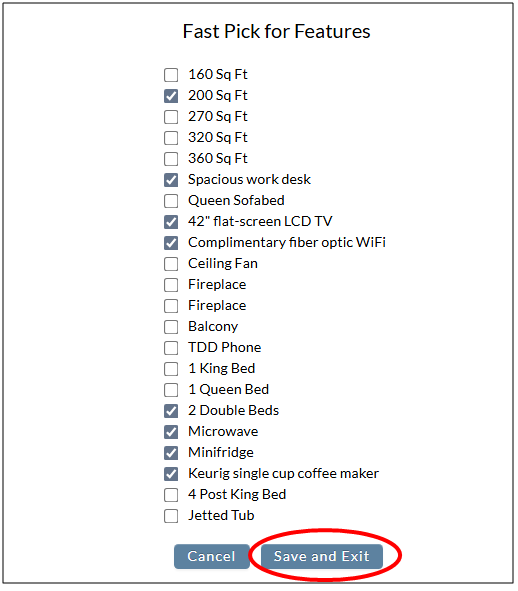
Check any feature to select it, then click the Save and Exit button to close the window and return to the Feature/Locations tab, where the selected options will now be displayed.
Every feature selected will be shown in the room description area for the particular Room Type (below the description entered (on the General tab) and to the right of the image).

Any Locations you wish to be associated with a room type should be selected in a similar way, using the Fast Pick for Locations button to open a pop-up window showing all the available location options. Again, check any location to select it, then click the Save and Exit button to close the window and return to the Feature/Locations tab, where the selected options will now be displayed.
Add a message to the general screen display to be seen when the web page is opened. This can be adjusted at any time, depending on the message - for example, to advertise a sale for a Holiday weekend. This provides flexibility and allows you to keep your outward facing web reservation system appearing current.
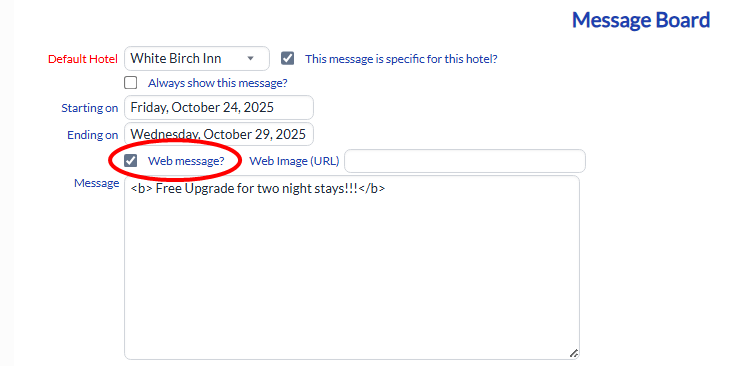
Date Range: You may decide to show this message for a specified date range, or to always show the message on the website.
By default, the date range to show the message may be specified, with today's date selected for both Starting and Ending Dates (meaning the message will only be shown today).
Starting on and Ending on Dates: Select the Starting on and Ending Dates for displaying the message using the drop-down menus or by clicking the Calendar icons. The message will only be displayed during the selected date range.
Note: If you wish to have the message always displayed on the outward facing web reservation system, instead of selecting dates, check the box Always show this message?. This will remove the Date selection options and cause the message to be permanently displayed, until manually removed.
Web Message?: Determines if this message is displayed on the outward facing web reservation system. This box may be checked or unchecked. By default it is unchecked, but to have the message be shown on-line it MUST be checked. Check to show the message entered in the Message field section on-line.
Web Image (URL): Image to show INSTEAD of the Hotel image (added using the Other tab of the Property definitions screen). If you wish to have a "special offer" image shown instead of the Hotel image, enter the URL in this field.
Note: This field overrides the Hotel image field, any URL entered here will be automatically be shown, rather than the image added using the Property Definition Other tab.
Message: Message to be displayed – HTML tags can be used. This is the message that the guests will see on the web when arriving at the website.
A Package Plan combines several package components in order to build a package to be sold to a guest. If the Package Plan is to be available on the outward facing web reservation system, it needs to be enabled using the Package Plans screen, General tab. Several fields are involved in this.
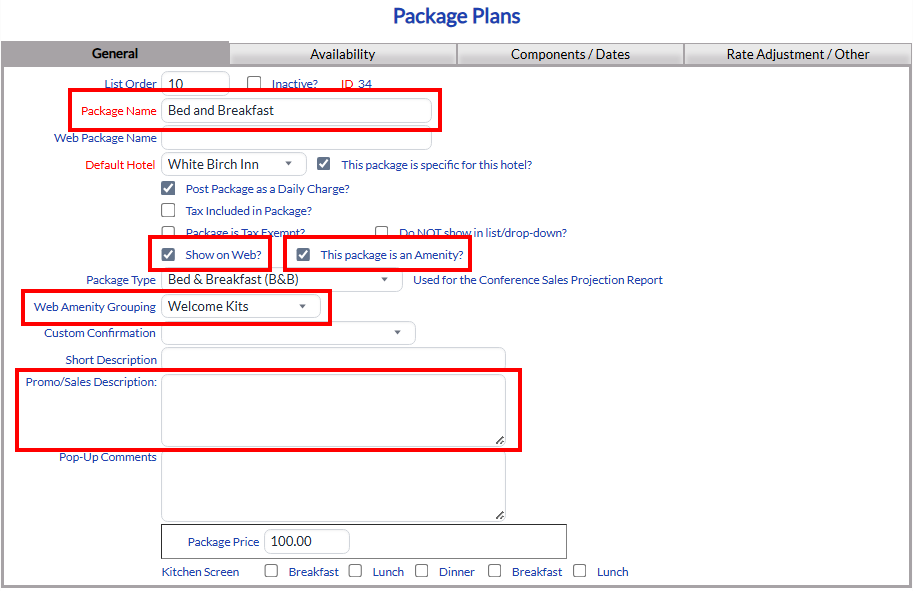
Package Name: Enter a name for the Package Plan. This should be short but descriptive. If the Package will be appear on-line, this is the name that will be shown.
Show on Web?: Allow this package to be sold on the web. This box may be checked or unchecked. By default it is unchecked, but to have the Package Plan be available on-line it MUST be checked. Check to show the Package Plan for the web reservation system.
Note: For a Package Plan to be shown on-line, ONLY these two fields require your input (the hotel field will be automatically completed). However, more of the fields can be useful for tailoring the Package to your on-line needs.
This package is an Amenity?: This box may be checked or unchecked. By default it is unchecked, if the Package Plan is considered an amenity it should be checked.
IF the Package Plan has both the "Show on Web?" AND the "This package is an Amenity?" check boxes marked, another field will appear on the General tab, the Web Amenity Grouping field.
Web Amenity Grouping: This is a drop-down list of the available web amenity groupings for showing on the web. Select the appropriate one to determine where the amenity will be listed on-line.
Promo/Sales Description: Enter any description that you wish to be shown for the Package Plan on-line into this field.
Your Skyware Web Reservation (Web Booking Engine) site will have "WebResv.aspx?" in the URL - for example https://www.skywaresystems.net/WebResv.aspx?PropertyRowID=157&HotelID=1&MenuRowID=47
Skyware accepts the following parameters as a means to entering the Web Reservation (Web Booking Engine) site from your Property Website, allowing you to create a “front-end” on your main page that sets defaults for the Skyware web reservation system.
These parameters are ways you can preselect items on the booking engine by adding on to the URL.
ArrivalDate=YYYY-MM-DD
PackageID=NN (ID available in the “Package Plans” screen)
RatePlanID=NN (ID available in the “Rate Plan Maintenance screen)
RoomTypeID=NN or NN,NN,NN,etc… (ID available in the “Room Type Maintenance screen)
Building=XXXXXX – Room types will be filtered by building
Nights=NN
Adults=NN
Children=NN
Pets=NN
Code=XXXXXXX – Any Group Confirmation or Negotiated Rate Code
Language=XXXXX – Valid Values = (English, Spanish, Chinese, French, Japanese)
ActivityTypeID – NN (ID available in the “Activity Types” Maintenance screen)
Note: The ActivityTypeID parameter is only available if you have purchased the separate Spa and Activities Module for Skyware.
You may also use these parameters for linking to the web site via email. One of those items for example may be a promotional Web Rate Plan. In an email blast to your customers, you could include the link to access an otherwise unavailable Rate Plan. You could also program the link into a button on your webpage, banner ad, etc...
The link might look like this:
https://www.skywaresystems.net:444/SkyBook?PropertyRowID=204&HotelID=1&MenuRowID=47&RatePlanID=958
Other parameters like Arrival Date, Number of Nights, Package ID can be used for special events or to get around length of stay restrictions.
If you have purchased the separate Spa and Activities Module for Skyware, the External Web Reservations system can also be used to schedule activities for your guests.
Note: This section of the External Web Reservations system is ONLY available if you have purchased the separate Spa and Activities Module for Skyware. If your Property does not currently have our Spa & Activities Module and you are interested in adding it, please contact us at Sales@SkywareSystems.com.
Your Property may have activities, such as spa treatments or tennis lessons available to book on-line for your guests. Activities at your Property may include anything you provide by an hourly basis, such as golf cart or kayak rentals, spa treatments, or transportation to and from the airport. These different types of scheduled activities will be unique to your Property, and are configured using the Schedule Type screen. (Schedule Types, or Activity Categories, are defined as the CATEGORIES your Property offers activities in, such as your Spa).
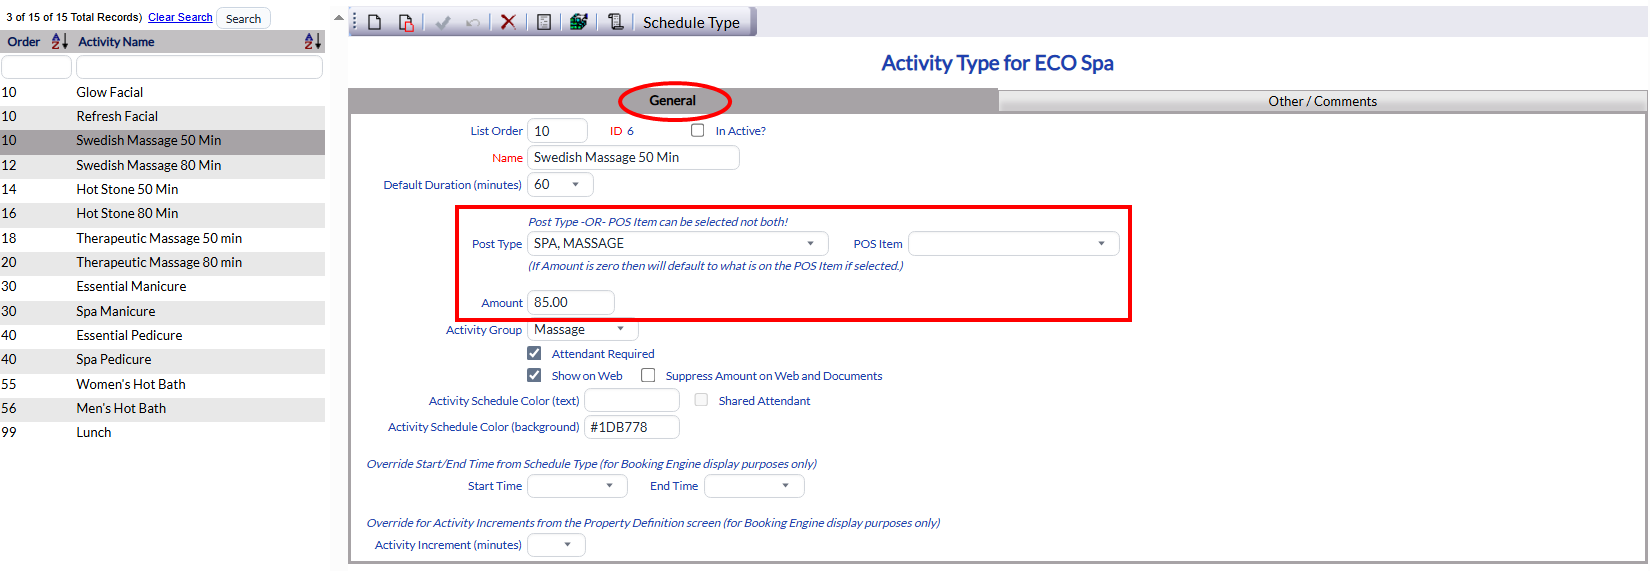
For an Activity to be available on-line, it must be enabled in the Activity Types sub-screen, General tab, of the relevant Schedule Types screen.
Note: The Activity Types screen for the specific activity is reached by clicking on the activity name in the Activity Types tab of the Schedule Type the activity is associated with.
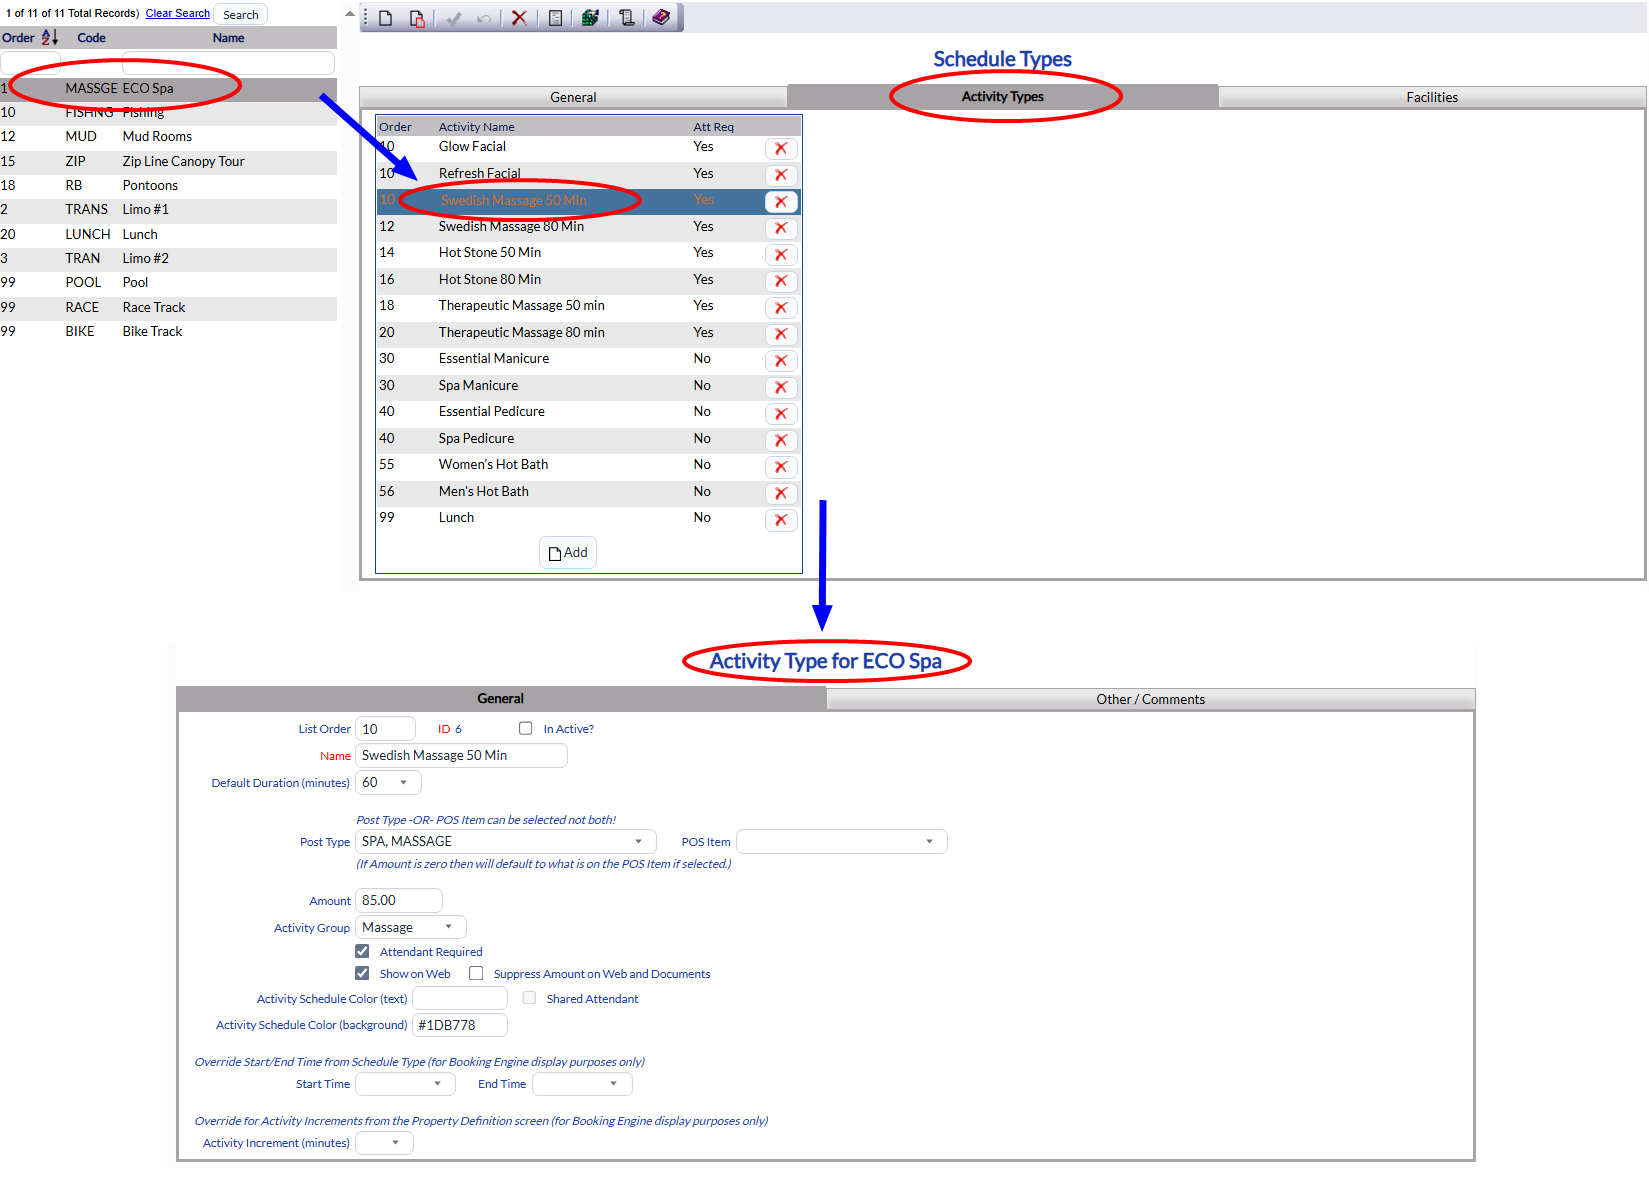
For an Activity Type to be shown on-line, ONLY the "Show on Web?" check box requires your input. However, more of the fields can be useful for tailoring the Activity Type to your on-line needs. Once the Activity Type screen for the activity has been opened, complete any relevant fields to allow the activity to be available on-line.
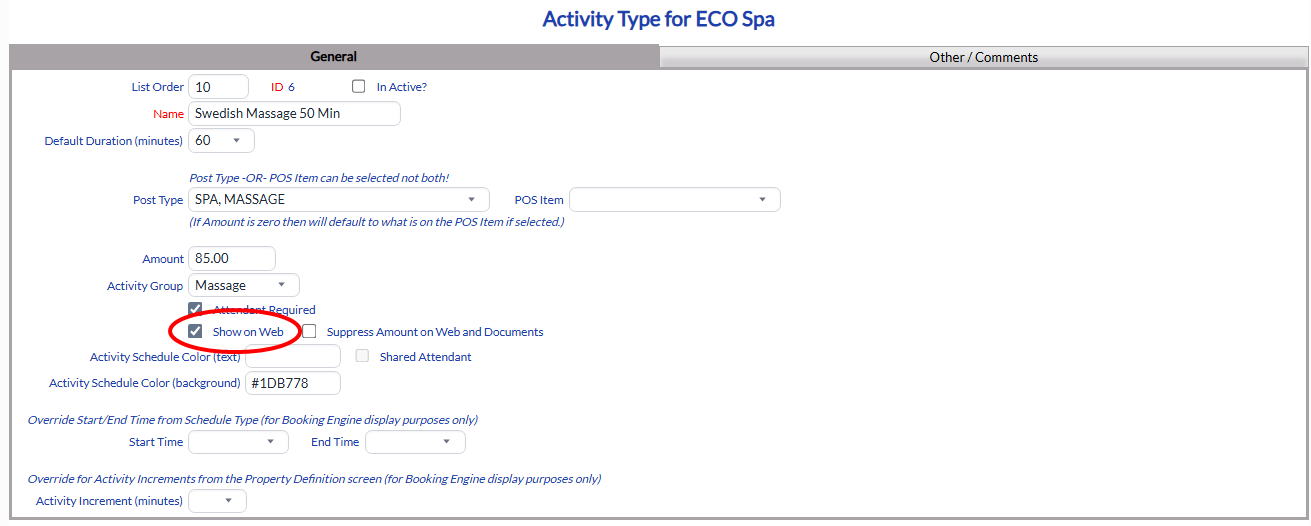
Show on Web?: This box may be checked or unchecked. By default it is unchecked, but to have the Activity Type be recognized as available on-line it MUST be checked. Check to show the Activity Type for the web reservation system.
Possible other relevant fields:
Activity Group: Used to help classify the Activity Type. Select one from the available options in the drop-down menu, or leave it blank.
Note: Activity Groupings, if you wish to use them, are selected in the Activity Types section of the Schedule Types screen. These are used to help classify the type of activities. Groupings are utilized to quickly filter selections, and are a way of organizing your activities to make the list to choose from easier to navigate quickly. The Activity Groupings command allows you to create the groups used when arraying the activities available on the Web Booking Engine.
Suppress Amount on Web and Documents: This box may be checked or unchecked. By default it is unchecked, check this bos if you do not wish the cost of this activity type to be shown on-line.
An activity does NOT have to be associated with a STAY. For example, your Property may have a day-use spa, or a golf course open to the public. If this is the case though, to be available on-line it requires a few more steps, with the activities then also appearing in a separate, Activity Only Booking Interface.
When purchasing the Spa and Activities Module, the ACT Room Type and ACT1 Room # will be automatically added to your system. These two additions together act as "holding places" for any activities that will NOT be associated with a guest stay (creating a parallel "stay" in a non-bedded room for the activity). You WILL however need to click the “Show on Web” option in the Room Types maintenance screen for the ACT Room Type, and select options on the Room Definition screen for the ACT Room Type and ACT1 Room # to enable their use for an Activities Only web reservation system. Any activities enabled for on-line viewing in the Activity Types section of the Schedule Types screen will then also be available in the Skyware Activity Only Booking engine.
Skyware's Outward Facing Activities ONLY Web Reservation site may be accessed through Skyware by using the Web Activity Only command found in the Web section of the Other Front Desk Tasks Menu, and provides a view of the Activity Only booking interface seen by the end user when they make a reservation from the web.
Link from your Property's website to an Activity Only Booking engine, which will utilize the ACT Room Type and the ACT1 Room # for making reservations, using the optional parameter ActivityTypeID (ActivityOnly=Y).
Example of the activity only URL: https://www.skywaresystems.net:444/SkyBook?PropertyRowID=1&HotelID=1&ActivityOnly=Y
This is done using the Room Types screen AND the Room Definition screen.
Room Code: First, ensure that the Room Type code selected is "ACT".

This Room Type is automatically generated for you and should appear in the list of Room Types on the left of the screen. When selected, it will display on the right.
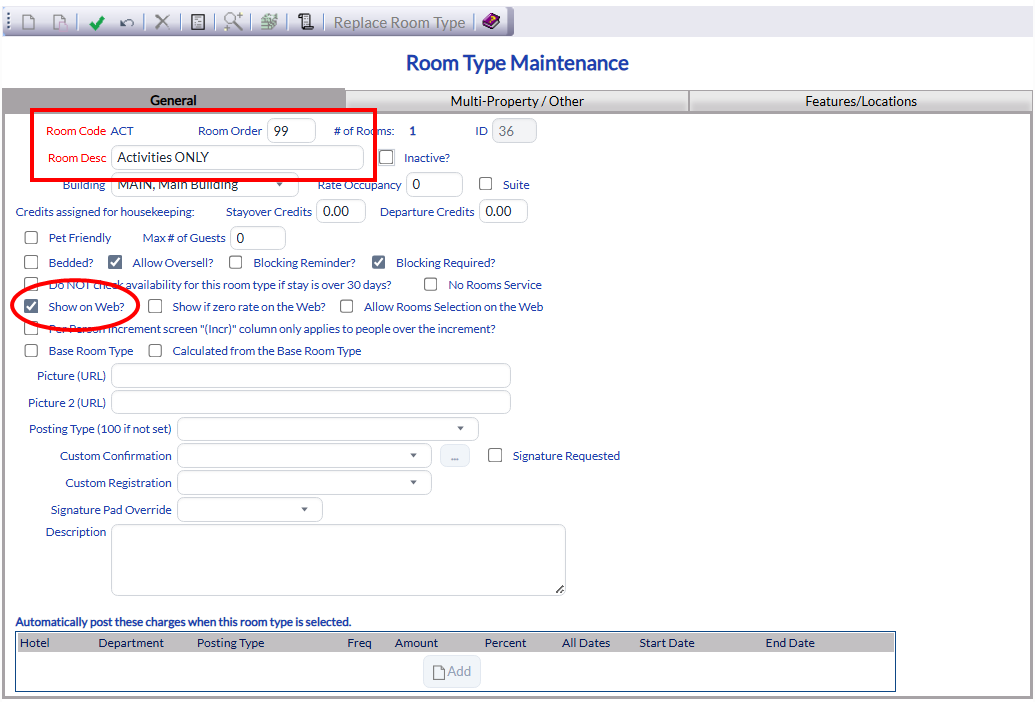
The Room Code must be ACT and the Room Description must be completed (with a reference to activities only being entered for you).
Show on Web?: Determines if this Room Type is shown on the outward facing web reservation system. This box may be checked or unchecked. By default it is unchecked, but to have the Room Type be available on-line it must be checked. Check to show the Room Type for the web reservation system.
Again, ensure that the Room Type code selected is "ACT". There should only be one room number associated with this room type, ACT1. When selected, it will display on the right.
Note: The options for use with the web reservation system are limited to non-bedded rooms and therefore are only visible if the "Bedded?" checkbox is NOT checked. As the ACT Room Type is automatically added, by default the box is unchecked. However, if for some reason it appears as checked, simply uncheck it to show the options you need
Default room for activity/amenity only stay: This box may be checked or unchecked. Check this box for the ACT Room Type, ACT1 Room # to enable them for the web reservation system.
Note: This default can only be checked ONCE per Property.
Allow multiple stays to be booked into this room at the same time: checkbox in the “Room Definitions” screen. Allows unlimited activities to be assigned to the ACT1 room number. This box should be checked.
Enabling ACT and ACT1 for on-line use ensures that when the night audit is run (the night before the scheduled activity), it checks in automatically any ACT Room Type bookings (the morning the activity is to take place). It will also open a POS check for those activities that are set up to require a payment.
Then, when the night audit is run again (for the "day of" the activity), it will auto check out the ACT Room Types booking Folios, and the activity will be posted. Nothing further needs to be done, UNLESS you wish to allow a deposit to be taken.
When an activity only is scheduled, it will generate a booking with a confirmation number. HOWEVER, whilst this booking is created, any charge associated with the activity cannot be assessed until the time of service UNLESS appropriate steps have been taken. If an activity is created then a parallel stay will be created for a deposit, ONLY when a credit card is present, contact information is present, and a posting type, amount, and autocharge is set on the Activity Type. If everything has been correctly entered, when the booking is made the deposit balance will be accepted and entered into the guest ledger under the parallel stay. Then when the night audit is run the night before, the parallel stay will be checked in automatically AND the deposit will be transferred to the POS ledger and posted to the check that is also automatically opened for that activity. The posting to the POS and the offsetting posting will utilize the “Activity Only balance transfer Posting Type”. When the night audit is run the day of the activity Skyware will automatically check-out the parallel stay. If all is set up correctly there should be no need to monitor the parallel stays.
Note: Confirm that the Room Type "ACT" DOES have the box "Show on Web" checked on the Room Type Maintenance screen, and the Room Definition screen for the ACT Room Type, ACT1 Room # DOES have the "Default room for activity/amenity only stay" checkbox and the "Allow multiple stays to be booked into this room at the same time" checkbox checked. These need to be in place for the Activity Only External Web Reservations system, whether or not a deposit is to be taken.
For all Activity Only deposits, the amount of the deposit to be taken must be specified. This is done for each activity by using the Activity Types sub-screen, Other/Comments tab, of the relevant Schedule Type screen.
(Again, the Activity Types screen for the specific activity is reached by clicking on the activity name in the Activity Types tab of the Schedule Type the activity is associated with).
Open the Activity Types sub-screen, Other/Comments tab.
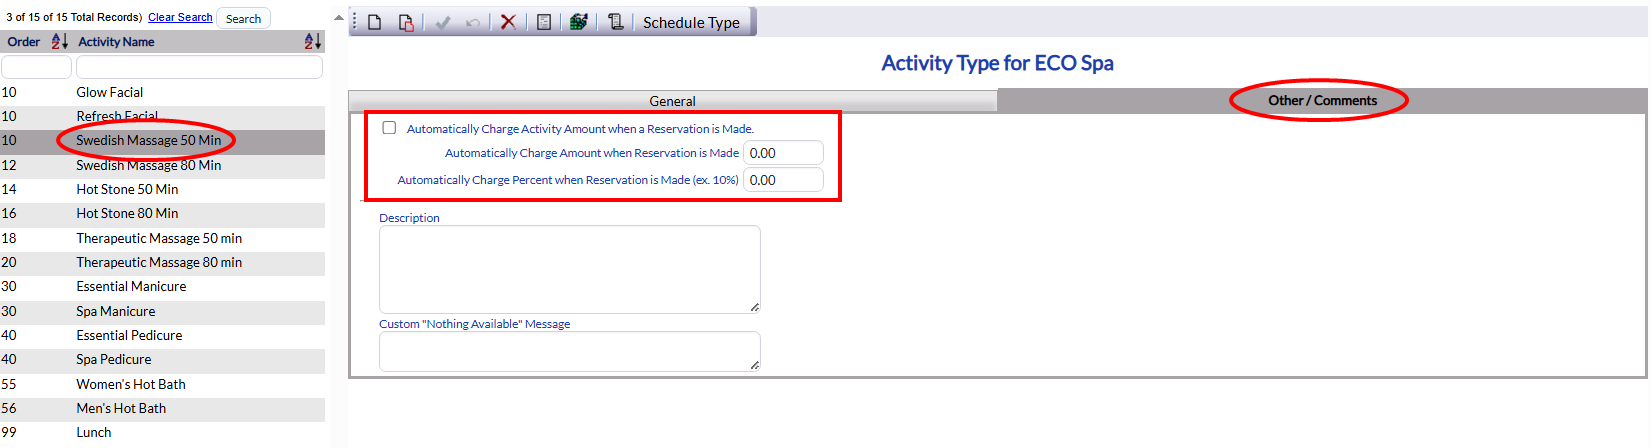
This tab has 3 choices for the amount of deposit to be taken for an Activity. If a deposit is to be taken at the time of reservation, ONE of the three options available on the Other/Comments tab should be selected.
Choose from:
Automatically Charge Activity Amount when a Reservation is Made: Check this box if the FULL amount of the activity charge amount is required at the time of booking.
If a charge that is NOT the full amount is to be made, you may use one of the other two fields to specify either an amount or a percentage of the full cost to be posted at the time of the reservation.
Automatically Charge Amount when Reservation is Made: Enter an amount to be charged into this field. This is a fixed total.
Automatically Charge Percent when Reservation is Made (ex. 10%): Enter the percentage amount to be charged into this field. This total will change if the amount to be charged for the activity changes.
Note: If any deposit requirement is entered, you will need to ensure that both the Posting Type and Amount fields on the General tab have been completed. Be sure to select a Posting Type that has the Activity ONLY balance transfer Posting Type check box selected (If not, nothing will post).
Ensure that these fields have been completed for EVERY Activity Type available on the Outward Facing Web Reservation system that will have a deposit taken.
Whenever using the Activities module of Skyware, if you wish to be able to take a deposit for an Activity ONLY (i.e. one NOT associated with a stay), you must have a Posting Type with this box checked to allow the charges to be posted correctly. If not, any activities not associated with a stay cannot have a deposit taken, they can only be charged for at the Point of Sale. This includes online.
Ensure that a Posting Type has been selected as the activity only balance transfer posting type. This is done using the Post Type Maintenance screen, general tab.
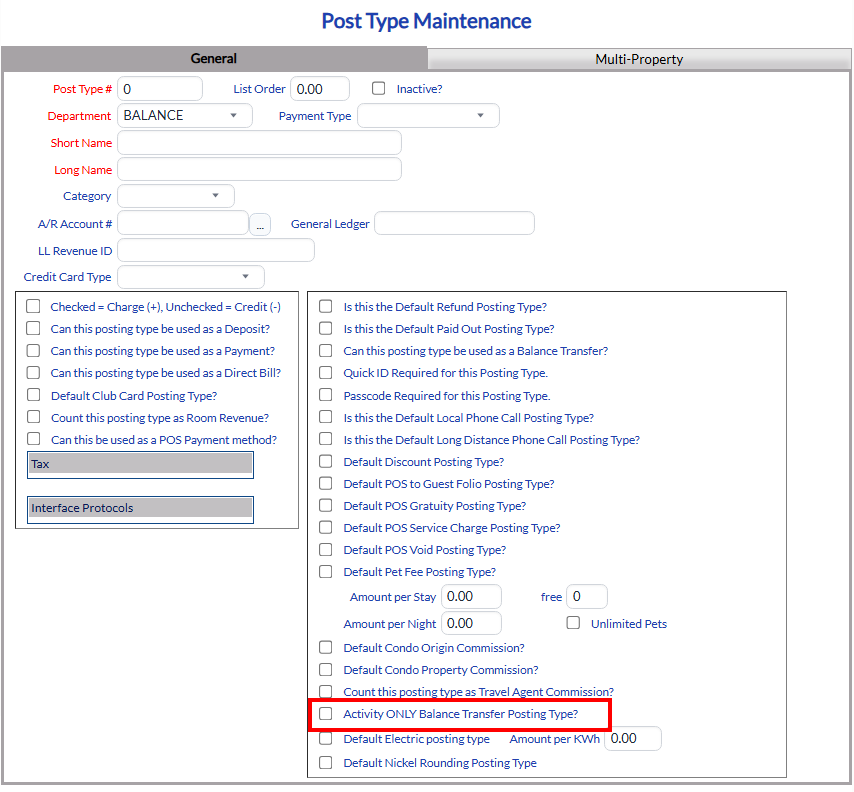
You must have ONE Posting Type with this box checked to allow the charges to be posted correctly (allowing the posted charges to be moved from the Guest ledger to the POS ledger during the Night Audit process).
Note: If an activity is canceled, the booking will be canceled, ONLY if there is no balance associated with it. If a deposit has been made, the guest will need to call your Property to cancel (and have the deposit refunded to their card).
Skyware Systems now also offers MOBILE and/or CONTACTLESS Check-In for your guests, if desired. Any reservation made with a credit card may be enabled for mobile/contactless check-in. The screens shown for mobile/contactless check-in use the same information as the Web Reservation (Web Booking Engine) site so will appear with the same customization. To utilize this option, you will need to ensure that the system is set up to allow mobile/contactless check-in.
Note: Mobile/contactless check-in is for ONE ROOM reservations with no problems (no previous guest complaints or denials) made with a credit card only. Mobile/contactless check-in cannot be used if the reservation is for more than one room, if the guest account is not in good standing, or if a credit card is not currently on file for the reservation.
On the Other tab, in the Other Configuration Items section, you MUST have the "WEBALLOWCHECKIN" option set to "Y" to allow ANY mobile or contactless check-ins.
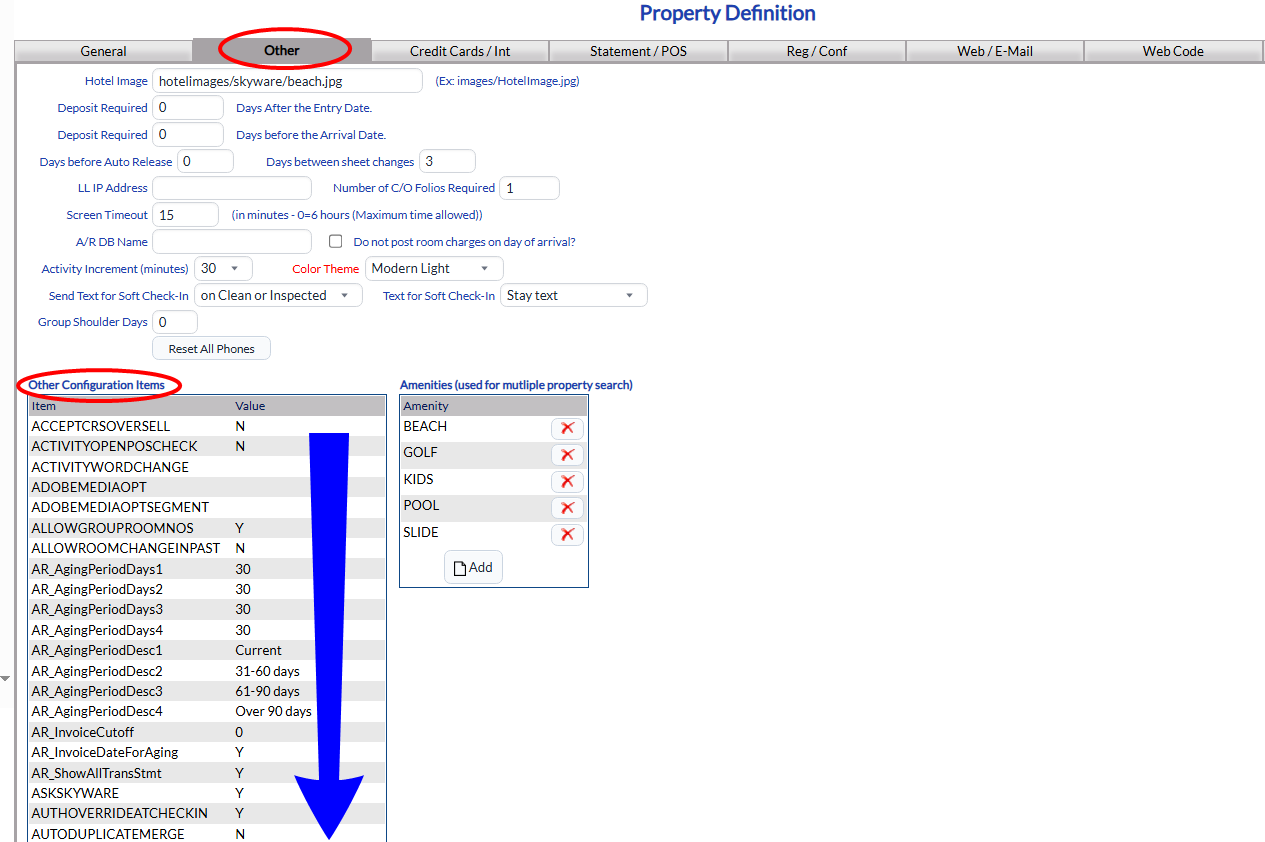
This section is alphabetical; scroll down to find the option within the section.
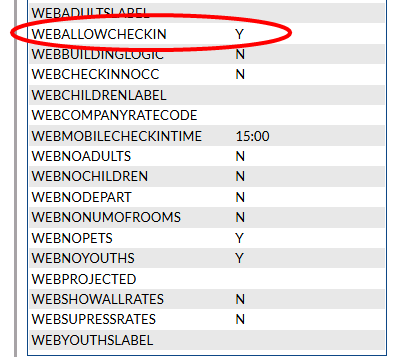
If the value is set as "Y" simply leave it as is. If it is set as "N" click on the option to change it.
Clicking on the WEBALLOWCHECKIN option will open the Other Hotel Definitions screen, with the option selected and displayed on the right.
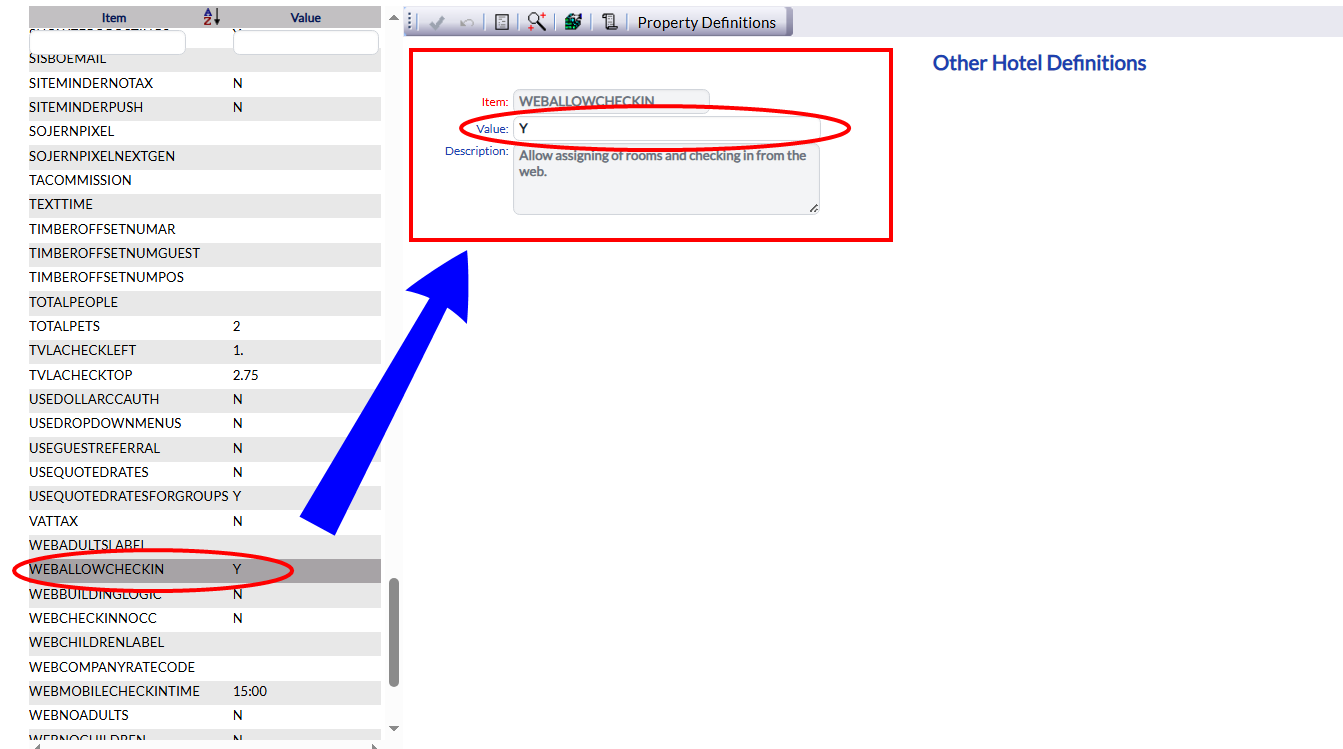
Item: The name of the configuration option.
Value: The Value given to this configuration option.
Description: The description of the configuration option, explaining what function the option performs.
Note: ONLY the Value Field will be available for changing. Change the value field by manually typing in Y (for yes) instead of N (for no).
Changing the value field will make the save icon in the local tool bar live.

Save the change, then click the button "Property Definitions" to return to the Property Definitions screen. The WEBALLOWCHECKIN option should now have the value "Y".
Note: By default, the Web Check-In time is set in Skyware as 15:00 (24 hour clock, 3pm). This means that - once web check-in has been allowed - it will be available after 3 pm on the arrival date.
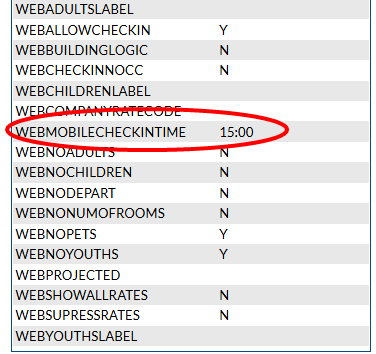
IF you wish to ADJUST the web check-in time, click on the WEBMOBILECHECKINTIME option to open the Other Hotel Definition screen once more.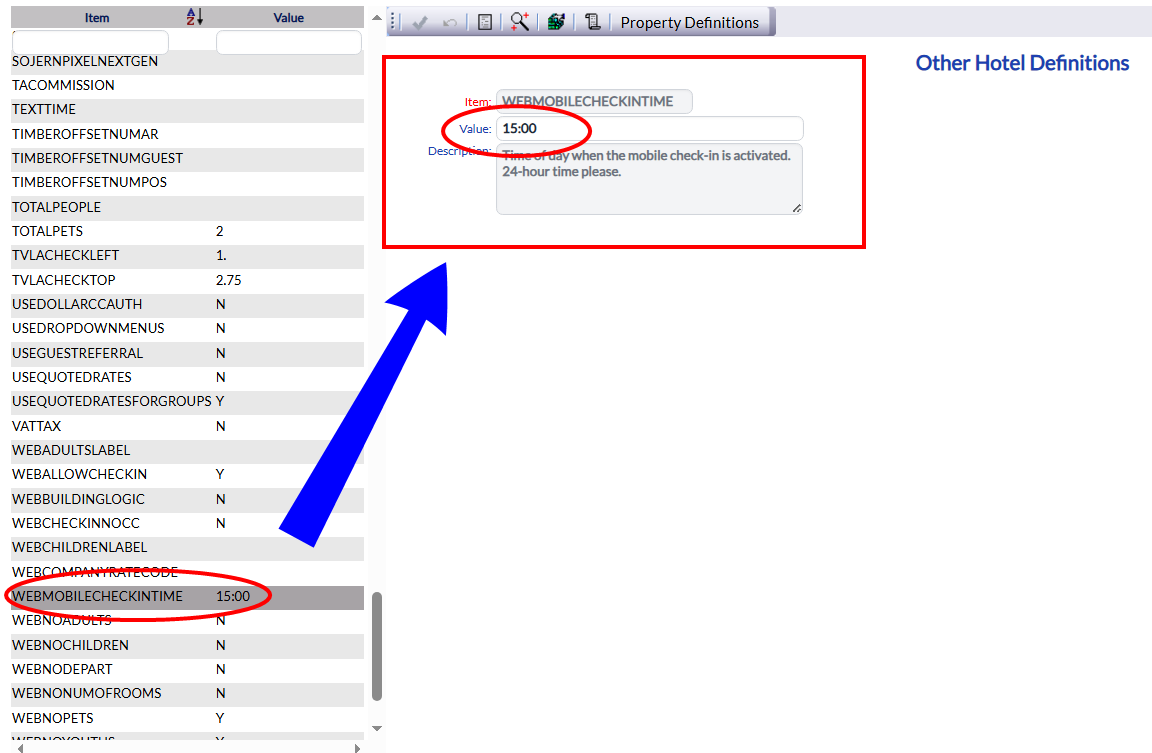
Change the given time in the Value field on the Other Hotel Definitions screen. Please use military time, 24 hour clock values for this option. Again, changing the value field will make the save icon in the local tool bar live, allowing you to save the change
The Reg/Conf tab contains the field "Mobile Check-In Confirmation". This field allows you to add the custom email that will be sent to a guest once mobile/contactless check-in has occurred, containing the electronic key code details allowing the guest to enter the accommodation.
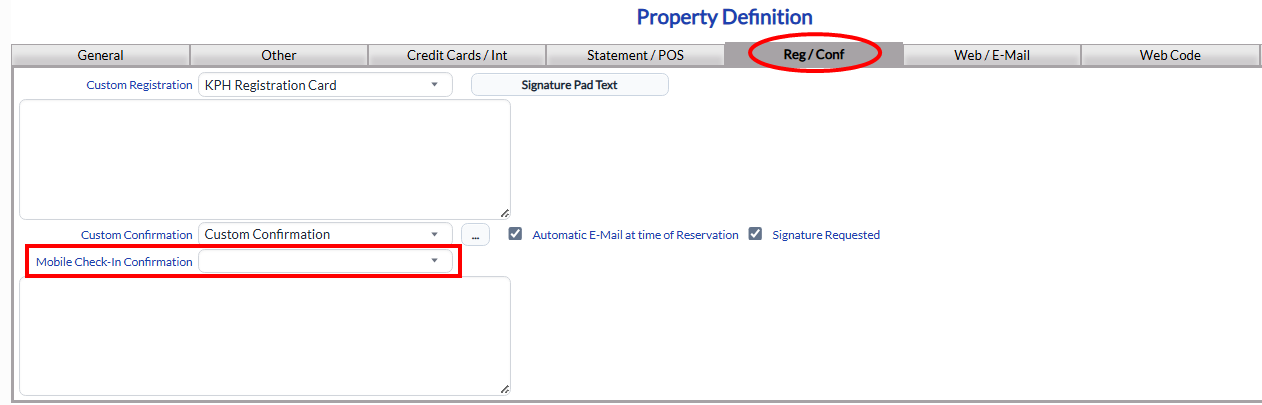
Mobile Check-In Confirmation: This is drop-down menu. Use it to select the custom email containing the details allowing them entry into the accommodation, that will be sent to the guest once the check-in process has been completed.
Note: The custom confirmation email must have been previously generated to be available for selection here. For information on creating this custom email, please see How to create or customize your documents.
External Mobile Check-In Disclaimer: This field is for the external mobile check-in disclaimer that will be displayed when the guest uses the mobile check-in option after reserving a room using Skyware’s external web reservation system. Enter it manually into the field.
External Mobile Confirmation Message: This field is for the external mobile check-in confirmation message that will be displayed when the guest uses the mobile check-in option after reserving a room using Skyware’s external web reservation system. Enter it manually into the field.
Mobile/contactless check-in utilizes the (ADA compliant) version of the Web Reservation system. The same web code fields are used for mobile check-in as for the external web reservation site. The relevant HTML text should already be entered here in the appropriate fields (Responsive/Mobile External Resv. HTML (Top) an Responsive/Mobile External Resv. HTML (Bottom)) on this tab to "encapsulate" the screen seen by the user.
To allow Depending on if your Property will be using MOBILE check-in or not, you may need to adjust the guest types. Only guest types with the check box "Allow Mobile Check-In?" checked will have mobile check-in be available as an option for their reservation. This option is found on the general tab of the Guest Type Maintenance screen.
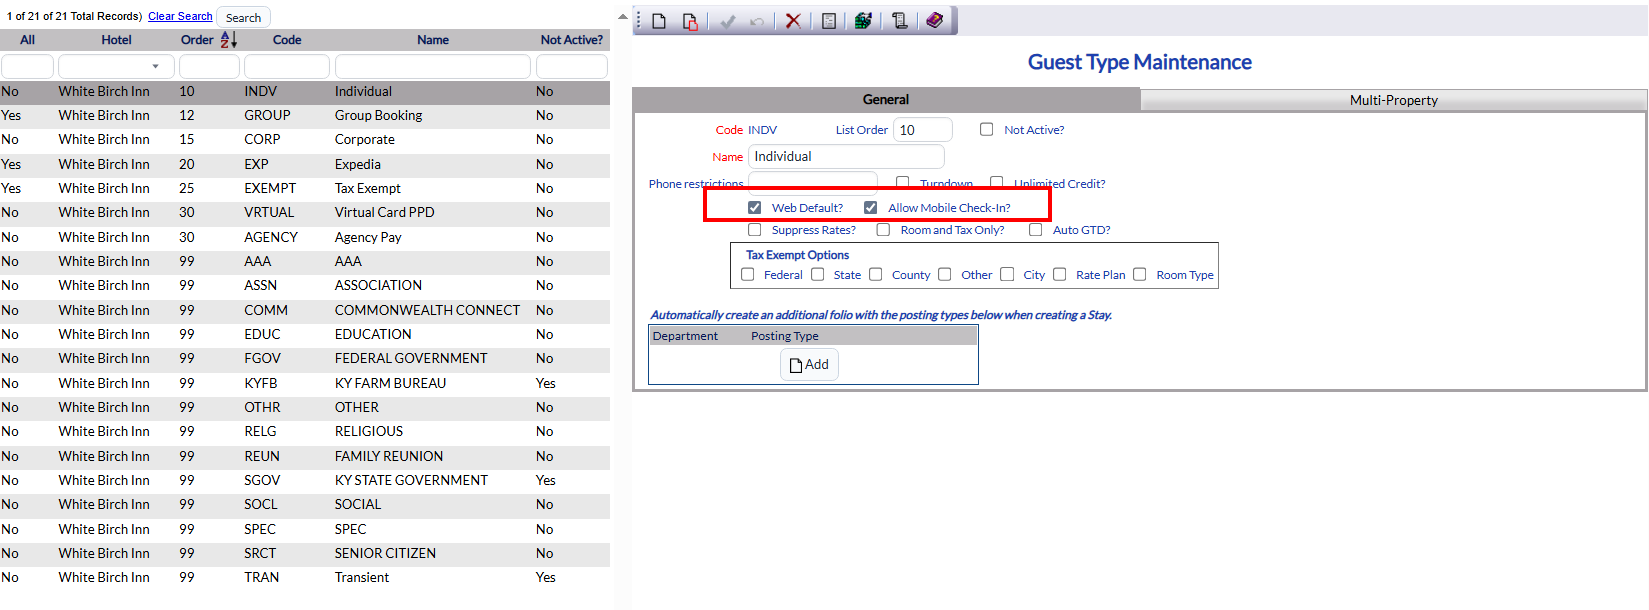
Web Default: This box may be checked or unchecked. It MUST be checked for ONE guest type. If a guest is created on the web then this is the default guest type. Guests using the external web site to create a reservation create a guest account for the stay (if one does not already exist).
Allow Mobile Check-In?: This box may be checked or unchecked. It MUST be checked to allow mobile check-in for this guest type. (Check this box for each guest type that will be allowed to use mobile check-in).
To allow mobile check in for on-line reservations, BOTH boxes must be checked.
Note: ANY guest type can use the contactless check-in option. Mobile check-in assumes that the guest has a "trusted" status already established, and therefore requires extra action on your Property's part to indicate this.
To ensure that your guests know that they can use mobile/contactless check-in, you should add the information to the reservation confirmation email that will be sent whenever a reservation is made.
If your Property will be using MOBILE check-in, you must also add the URL link for the guest to follow to reach the check-in screen. For example, see https://www.skywaresystems.net:444/SkyCheckIn?PropertyRowID=157&HotelID=1&MenuRowID=2764&ConfirmNo=44C12986 to open a sample check-in screen.
For help on making these changes to the reservation email please see How to create or customize your documents for details.
Note: Mobile Check-in is available ONLY on the arrival date, after the specified check-in time, for the allowed guest types. If the link is used prior to this, or by a guest type not designated as allowed, after the details have been entered an error message informing the guest that the itinerary cannot be found and instructing them to call the front desk will appear. This prevents any check-ins occurring in error.
Date Updated May 14, 2026